A few weeks ago, my daughter Diana and I went to New York City for a few days. While we were there, we did quite a bit of snoop shopping. One of the items we found was in the Anthropologie store in Chelsea Markets. It was a very simple knit dress that was seamed in an unusual way. She really liked it, but not the price (about $108!). As soon as we left the store I sketched out the dress and said I would make one for her.
Another stop was Metro Fabrics, where the (in)famous Kashi listened to the description of the dress and immediately pulled out the perfect knit for it.
Today, with Diana visiting for the weekend from her summer internship, I took a few measurements and made the dress... all in about an hour and a half.
Here's the front view:
 It really is a very simple dress: no darts, just two seams.
Back view:
 Diana used a black scarf as a belt to give the dress some shape. Without the belt, it really is very loose.
Here's a close-up of the binding and straps:

Folks, this dress was dead simple to make. It took just a few measurements. It's so easy that I'm going to give you the instructions right here.
Here's a diagram with the measurements you'll need:
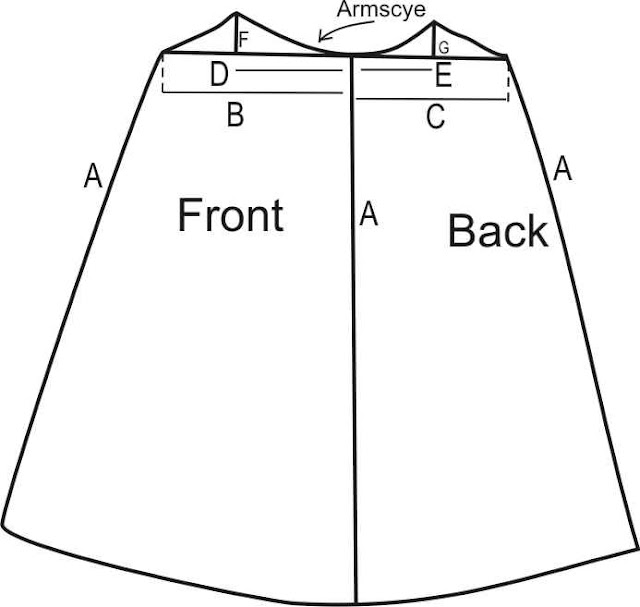 A: distance from bottom of armscye to desired length
B: distance from side to center front (baseline front)
C: distance from side to center back (baseline back)
D: distance from side to bust point
E: distance from side to desired location of back strap
F: distance from bust point to desired location above bust
G: distance from baseline back to top of back strap
Measurement A is also used for the center front and center back.
Layout and Cutting:
You will need 3 yards of 60" wide fabric, preferably a very lightweight knit. Cut it into two pieces and rotate one 180 degrees so the pattern and grain are running in the same direction. Lay them out right sides together. C will probably be shorter than B, so keep that in mind when laying out line A.
Mark the center line A as your reference line; it needs to be just a bit off-center of the midline of the fabric. Draw lines B and C perpendicular to line A. Mark the points for D and E on the baseline, then mark the lines F and G perpendicular. Connect the ends of the lines with gentle curves, as shown in the diagram.
The width of the dress is limited only by the fabric. From the outer end of lines B and C, draw a line the length of A, angled out as far as the width of the fabric will allow you. Join the ends of the A lines with a curve.
Sewing:
Sew the center front and center back seams, preferably with a serger.
To make the binding: use some of the scrap fabric and cut strips 2" wide. Fold in half, and then fold the raw edges in on both sides to form double-sided binding. Sew the binding to the armscyes first. Trim the ends to the raw edges of the front and back curves.
(How I sewed the binding: I matched up the raw edge of the binding to the outside of the dress, then stitched along the fold with a regular sewing machine. I then folded the strip to the inside and topstitched close to the edge to "seal" the binding.)
Find the center point of another long strip of binding and sew it to the front curve. Try the dress on and pin the straps to the back curve at the desired location. Sew into place, seaming the binding at the center back. Hem the dress, and you're done.
Diana has already requested a second dress using the same "pattern." If you decide to make one, please let me know how it went! I'm still kind of new at writing tutorials.
Another stop was Metro Fabrics, where the (in)famous Kashi listened to the description of the dress and immediately pulled out the perfect knit for it.
Today, with Diana visiting for the weekend from her summer internship, I took a few measurements and made the dress... all in about an hour and a half.
Here's the front view:

Back view:

Here's a close-up of the binding and straps:

Folks, this dress was dead simple to make. It took just a few measurements. It's so easy that I'm going to give you the instructions right here.
Here's a diagram with the measurements you'll need:

B: distance from side to center front (baseline front)
C: distance from side to center back (baseline back)
D: distance from side to bust point
E: distance from side to desired location of back strap
F: distance from bust point to desired location above bust
G: distance from baseline back to top of back strap
Measurement A is also used for the center front and center back.
Layout and Cutting:
You will need 3 yards of 60" wide fabric, preferably a very lightweight knit. Cut it into two pieces and rotate one 180 degrees so the pattern and grain are running in the same direction. Lay them out right sides together. C will probably be shorter than B, so keep that in mind when laying out line A.
Mark the center line A as your reference line; it needs to be just a bit off-center of the midline of the fabric. Draw lines B and C perpendicular to line A. Mark the points for D and E on the baseline, then mark the lines F and G perpendicular. Connect the ends of the lines with gentle curves, as shown in the diagram.
The width of the dress is limited only by the fabric. From the outer end of lines B and C, draw a line the length of A, angled out as far as the width of the fabric will allow you. Join the ends of the A lines with a curve.
Sewing:
Sew the center front and center back seams, preferably with a serger.
To make the binding: use some of the scrap fabric and cut strips 2" wide. Fold in half, and then fold the raw edges in on both sides to form double-sided binding. Sew the binding to the armscyes first. Trim the ends to the raw edges of the front and back curves.
(How I sewed the binding: I matched up the raw edge of the binding to the outside of the dress, then stitched along the fold with a regular sewing machine. I then folded the strip to the inside and topstitched close to the edge to "seal" the binding.)
Find the center point of another long strip of binding and sew it to the front curve. Try the dress on and pin the straps to the back curve at the desired location. Sew into place, seaming the binding at the center back. Hem the dress, and you're done.
Diana has already requested a second dress using the same "pattern." If you decide to make one, please let me know how it went! I'm still kind of new at writing tutorials.
What a gorgeous dress and Diana looks fabulous in it. Kashi certainly came up trumps with that beautiful fabric - he is so nice!
ReplyDeleteThat girl is beautiful! It has been delightful to see her grow into a wonderful woman. The dress is great, too.
ReplyDeleteThank you so much for commenting on my blog today. Your kind words of encouragement mean the world to me. I look forward to sharing vintage with you for years to come!
ReplyDeleteI am envious of your talent to be able to look at a dress and then make it without a pattern. My grandmother could do that, but she wasn't able to teach me. The dress you made your daughter is stunning!
You made Diana a T-shirt quilt and stated that you used Rowley Company's iron-on stabilizer...they have several kinds, could you please post here which ones you used? Thank you!
ReplyDeleteI used the R-TEX Fusible Stabilizer from Rowley's. It's only available to the trade, in full rolls. It's wonderful stuff!
ReplyDelete